TL;DR
In small closet studios, the key to better sound isn’t just foam—it’s smart placement, absorption, and ventilation. Moving your rig into another room often beats any foam treatment, and proper airflow prevents heat buildup in sealed spaces.
Ever tried recording in a closet and ended up with a muffled, echo-y mess? That’s because tiny rooms are echo chambers, full of reflections bouncing off every wall, ceiling, and floor. But here’s the twist—most of your sound issues aren’t just about adding foam or blankets. They’re about where your rig is, how it’s placed, and how you handle heat and noise.
This guide isn’t about buying a closet full of foam. It’s about understanding the real fixes—moving your gear out of the way, treating the right surfaces, and making sure your setup stays cool and quiet. Once you get these basics, your recordings will sound clearer, warmer, and more professional without breaking the bank.
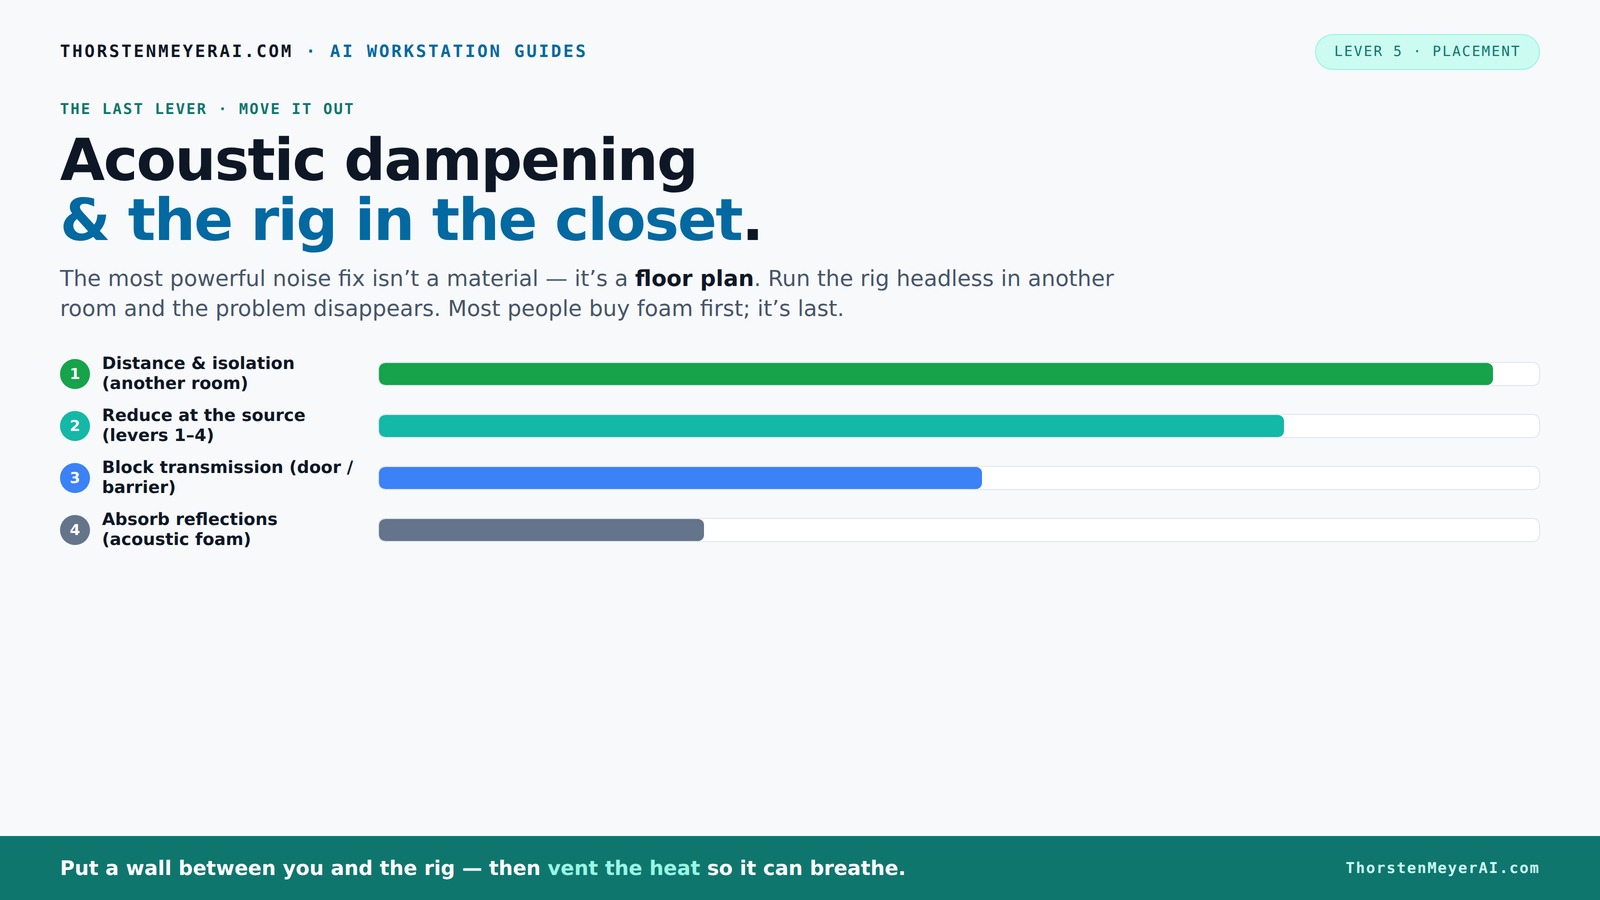
Acoustic dampening
& the rig in the closet.
The most powerful noise fix isn’t a material — it’s a floor plan. A rig you can’t hear because it’s in another room beats any amount of foam. Tap the approaches in Part 1 to see what actually works.
(another room)
(levers 1–4)
(door / barrier)
(acoustic foam)
Contain the noise, not the heat
Key Takeaways
- Moving your rig into another room often yields greater noise reduction than acoustic foam.
- Treat reflection points—especially behind and beside your mic—for clearer recordings.
- Seal gaps around doors and vents to prevent sound leaks and improve overall control.
- Ensure your closet has proper ventilation—use passive vents or quiet exhaust fans—to avoid heat buildup.
- Combine DIY solutions like blankets, rugs, and foam panels for a budget-friendly, effective setup.
soundproof room divider for recording studio
As an affiliate, we earn on qualifying purchases.
As an affiliate, we earn on qualifying purchases.
Why Your Closet Rig Is Both a Blessing and a Noise Monster
A closet is a tiny, reflective box. It’s perfect for isolating sound, but it also amplifies echo and low-frequency buildup. When you put a mic inside, reflections bounce back from walls, ceiling, and furniture, creating a boxy, unnatural sound. But it’s not just about sound—your rig’s fans and GPU hum loudly in this small space.
For example, if you record vocals in a closet without treatment, you’ll notice a dull, muffled tone with harsh reflections. But move your rig into a different room, and suddenly, that noise drops to a whisper. The room’s size, shape, and surface materials shape what your mic hears—and what your ears perceive.
In essence, a closet can be a tool or a trap. The secret? Use it wisely, treat the surfaces, and consider your placement choices.
acoustic foam panels for small rooms
As an affiliate, we earn on qualifying purchases.
As an affiliate, we earn on qualifying purchases.
Acoustic Dampening vs Soundproofing: What's the Real Difference?
Acoustic dampening and soundproofing are often confused, but they serve different goals. Dampening is about reducing echo, reverb, and reflections inside a space. Soundproofing stops sound from leaking out or coming in.
In a closet, dampening means adding soft materials—blankets, foam panels, rugs—that absorb internal reflections. Soundproofing involves sealing gaps, adding mass, and decoupling vibrations to prevent noise from escaping or entering.
For example, hanging blankets on the walls and ceiling cuts down on echo. But sealing the door with weatherstripping and adding mass with a dense door or panel prevents sound leaks. You need both, but most small setups benefit more from dampening first, then soundproofing if noise escapes.
Understanding this distinction helps you allocate your resources wisely. Over-using soundproofing in a small closet can deaden your sound or trap heat, so prioritize dampening for clarity and only add soundproofing if noise leaks are problematic.
portable sound isolation booth
As an affiliate, we earn on qualifying purchases.
As an affiliate, we earn on qualifying purchases.
Where to Place Foam, Panels, and Absorbers for Best Results
Placement is everything in a tiny studio. Acoustic dampening in a closet isn’t about covering every inch—it's about strategic positioning that maximizes absorption where reflections are strongest. Why? Because sound waves bounce off surfaces, creating echoes and muddiness that obscure clarity. Proper placement ensures that these reflections are absorbed before reaching the mic.
Start with the mic’s reflection points—areas where sound bounces back toward the mic. Use a mirror trick: sit in your usual recording position and move a mirror along the walls; where you see the mic’s reflection, hang a panel or foam there. This targeted approach prevents unnecessary coverage and keeps the space from feeling cluttered.
Ceiling and floor treatments matter too. Adding a rug or carpet reduces bounce from below, while ceiling panels prevent flutter echoes. For high frequencies, thinner panels (1-2 inches) are sufficient, but for low frequencies, thicker panels or bass traps in corners help control muddiness. Remember, in small spaces, covering larger areas with absorption often yields better results than focusing solely on corners, which are more critical at lower frequencies.
studio monitor isolation pads
As an affiliate, we earn on qualifying purchases.
As an affiliate, we earn on qualifying purchases.
Treating the Door, Gaps, and Floor for Total Sound Control
Sound escapes through the weakest points: the door, gaps, and floor. Treat these first because they are the most common leak paths that compromise sound isolation. Sealing gaps prevents external noise from sneaking in and your sound from escaping, which is vital if you’re recording in a shared space or want to avoid disturbing neighbors.
Use weatherstripping around the door frame to create an airtight seal. Hanging an acoustic blanket or a heavy curtain over the door adds an extra layer of absorption, reducing reflections and muffling noise leakage. For gaps around windows or vents, use acoustic sealant or foam strips—these small investments make a significant difference in overall control.
Floor treatment is often overlooked but crucial. Placing a thick rug or carpet can absorb bounce and vibrations, improving clarity. Additionally, damping vibrations traveling through the floor can prevent low-frequency leaks that muddy your recordings. Combining sealing gaps with absorbing floor treatments creates a more controlled environment, especially in tiny spaces where every decibel counts.
Common Mistakes to Avoid in a Closet Rig and How to Fix Them
One common mistake is focusing only on one aspect—like adding foam but ignoring gaps or placement. This can lead to a false sense of security, where the sound still rings and echoes because critical reflection points are untreated. Over-treating with excessive panels in tiny spaces can deaden the sound unnaturally, making recordings sound flat or distorted. Balance is key.
Another mistake is neglecting heat and airflow. Closed, sealed closets trap heat, risking equipment overheating and affecting performance. Incorporating ventilation—passive vents, ducted exhaust fans, or soundproofed vents—helps maintain a safe temperature while preserving acoustic integrity. For example, a small vent with a low-noise fan can prevent heat buildup without compromising sound isolation.
Placing the mic directly against reflective surfaces or near gaps can cause harsh, boomy recordings. Experiment with mic placement to find the sweet spot, and treat reflection points first. Remember, more treatment isn’t always better; it’s about strategic placement and balancing sound control with practical needs like airflow and comfort.
Budget-Friendly Tricks to Make Your Closet Rig Sound Amazing
You don’t need fancy gear. Simple DIY solutions can make a big difference. Hang moving blankets with hooks or tension rods to cover walls and the door, creating a flexible and effective barrier against reflections. Use old pillows or towels on reflective surfaces near the mic to absorb mid and high frequencies, preventing harshness. Rugs, thick curtains, and foam panels from Amazon are affordable options that can dramatically improve sound quality without breaking the bank.
For example, a $50 set of foam panels combined with a few blankets and a rug can turn a small closet into a surprisingly warm-sounding vocal booth. Sealing gaps with weatherstripping and adding basic absorption materials can elevate your recordings significantly.
Another practical tip: position your mic carefully. Placing it slightly off-center and away from reflective surfaces reduces harshness without requiring extensive treatment. Remember, the goal isn’t perfection but achieving a natural, clear sound that captures your voice authentically.
Frequently Asked Questions
Is acoustic dampening the same as soundproofing?
No, acoustic dampening reduces echo and reflections inside a space, while soundproofing prevents sound from leaking in or out. You need both for a controlled recording environment.Where should I place foam or panels in a closet booth?
Place panels at reflection points—behind the mic, on side walls, and ceiling. Use a mirror trick: position the mirror so you see the mic’s reflection in the wall, then hang foam or panels there.Do I need to treat the corners or the whole closet?
Corners with bass traps help control low-end buildup, but in small rooms, covering more surface areas—walls, ceiling, and even door—improves overall sound by reducing flutter echoes and reflections.Will moving blankets work as well as acoustic foam?
Yes, moving blankets are a cost-effective, easy-to-hang option that absorbs mid and high frequencies well. For best results, combine blankets with foam panels and treat reflection points.How do I prevent heat buildup in a sealed closet rig?
Incorporate ventilation—passive vents, ducted exhaust fans, or purpose-built soundproof cabinets with temperature control—to keep heat from accumulating and damaging your equipment.Conclusion
Your closet can become a surprisingly good studio—if you treat it like a small, reflective box that needs strategic damping and proper placement. Remember, the biggest wins come from moving the rig away, sealing leaks, and controlling reflections rather than just adding foam.
Think in terms of airflow, placement, and coverage. Your voice, and your neighbors’ peace, will thank you. Now go turn that tiny space into a soundproofed sanctuary where your recordings shine.